Showing posts with label Office Renovation. Show all posts

Friday, January 22, 2016

The story of a room...

In 1909, it was the front porch.

In the 1940's, it became the side porch when the new road was put in by the county; a new much larger and grander front porch replaced it.

In the 1960's, it was enclosed to be used as a bedroom for the elderly farmer because he could no longer climb the stairs to the bedrooms upstairs.

In the 1990's, the grand nephew of that old farmer sheet rocked over the old siding and used it as a T.V. Room.

(Photo:  December 2004  - That's our Hunter who was only 7 on the day this photo was taken. We had returned to take measurements and so on after our contract had been accepted).


In 2004, it became my office space.  That flooring was the original wood flooring of that old front porch.  There was nothing between it and the ground below.  During the winter months, I would have boots and gloves on to stay warm!  I could hardly wait to get to work on this room.


In 2010, we finally tackled this room.  David raised the floor to the same height as the rest of the downstairs rooms and insulated it.  We removed the sheet rock that had covered the original siding and the window you see in this photo.


It seemed that everyone loved this room as much as I did.  That old chair in the corner would be sought out by visitors over and over again.  Always my favorite room in the house, it's new warmth attracted just about everyone.

In 2015, I realized it was time for new colors throughout the house; the custom color of the trim and mustard of the walls had grown tired....and so I searched Pinterest for color ideas....and stumbled upon what I now think is a timeless color for our trim...Benjamin Moore's Iron Mountain!


We began with wisely hiring our son-in-law to paint the green ceiling (something I had wanted to do since 2004 but had not wanted to tackle on my own)..it took him about 12 hours altogether to get it ready for the final coat of paint; the dark color had hidden all the gaps in the 100 plus year old bead board ceiling.  After painstakingly putting up that first coat, we came to the realization that he had to caulk that thing...David ended up putting the final coat of paint up on day 4 of the job. The walls and the ceiling are now Benjamin Moore's Revere Pewter.

I am currently loading the room and will add more photos when I'm finished with that job...!  Out with the old and in with the new....a perfect start to a new year!


Monday, November 1, 2010

99% complete.....

I'm typing this in our brand new office....or least brand new in terms of its flooring since the uncovered walls have 100 year old siding on them (the paint color is new) and the ceiling is 100 year old beaded board (but with a couple of new coats of paint)....anyway, I'm a happy camper!


The "old" office - you can't really see it here, but you stepped down four inches when you entered the room - my desk now sits where those chairs used to be. You can just glimpse the Roll Top desk shoved into a corner of the room because of its size...

I knew that raising the floor four inches would make a huge difference to this room, but I underestimated the actual impact it would have on the how we view the whole of the house now - despite this room being a closed in porch it now looks like it belongs in a way it never did before. Not to mention that the insulation that now is between the sub floor and the new floor has made a big difference in the temperature of my usually bare feet.

As usual, the project went longer than expected - and as usual there remain a few items to be completed - like the crown molding and the framing in of the window - but my fear that we wouldn't be loading in until a few days before the rush of Thanksgiving didn't happen...again, I'm a happy camper.

We "borrowed" a few pieces of furniture from other rooms in the house...like one of the matching Lazy Boys from the Living Room....the plan was to put Papa's chair in here but that chair was built for a large man to relax in - it is perfect for Dallas who is built much like Papa was - but not a very comfortable chair for a smaller person to sit in and read for hours on a rainy Sunday afternoon. So Papa's chair replaced the Lazy Boy in the Living Room and I now have a perfect reading corner....the photos that hang now on this wall were borrowed from the staircase photo wall - temporarily. (The new window displaced a lot of the photos that hung there - once its framed in on that side I'll replace the photos in these frames with genealogy photos and hang these back up on the staircase wall.)
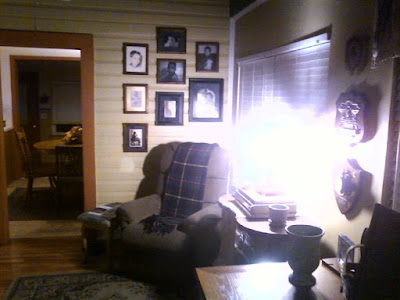


These photos were taken with my cell phone because it has a wide angle feature that my digital doesn't - so the quality is not as good as I would like - please ignore the glare from the lamp...that sits on the vanity table mentioned in the next paragraph....focus instead on the how the floor is now the same level as the kitchen floor and how I now have a perfect reading corner.....the more observant among us might notice that the valance hasn't been hung back up in this window yet - that's because the rod "froze" during storage for reno and needs to be replaced - I'll get to it....eventually.

An old vanity table that used to sit beneath a window in the Living Room now serves as an end table for that Lazy Boy....it was supposed to be temporary until I could find an end table at one of the antique stores, but I like it much better in this room....so I think it will stay.

There are now three bookcases where there used to be only two....with Dallas and Nikki now out of the house, we had an extra upstairs in Hunter's room - shoved into a corner where it really wasn't needed and didn't do much for the look of his room - so I dry brushed it to more closely match the other two and placed it in the middle of that matching set....its shorter than the others which created the perfect spot to put some of my genealogy binders that are too deep for anything but a custom made bookcase as well as some of the Civil War and Revolutionary War books that we have collected through the years. It's also deeper than the others and allows for the smaller of my binders to reside in it (rather than the old handmade set of shelves that I used before).


Another cell phone camera shot - a bit dark but you get the idea......the desk is directly across from these bookcases....which have empty spots for the photo boxes and smaller photo albums and additional genealogy binders that I plan on purchasing over the next few weeks - the plan includes getting all the hundreds of family photos organized and out of the various bureaus they currently reside in all over the house - and to get the genealogy paperwork out of the two baskets you see in this shot.....that's the plan anyway....

Perhaps the best thing we did was put the Roll Top portion of the huge desk into the eave and simply use the bottom of it in this room. This old Roll Top is huge and was perfect for our old house with its soaring ceilings and open floor plan...but it never really fit in this office. Dallas will get it when he eventually has a house so in the meantime, I have to make it work. Using only the bottom half of it allowed us to place it against the window wall...which in turn allowed me to bring in that Lazy Boy and vanity table.....but most importantly allows me to see out the windows as I putter away at Genealogy or work the DNA project, write letters, pay bills or whatever else I have to do.....(I can't wait for the Camellia trees to bloom...but in the meantime, I enjoy the hummingbirds and cardinals that flit around just outside....)


Finally, a view out the windows of the fields....

The new furniture arrangement even allows for the return of the printer cabinet that has been upstairs serving as a bedside table since we moved in....freeing up my desk top from having to hold that printer.....

As I said...I am a happy camper. I love this room. Maybe I'll get back to blogging more regularly now....

Monday, October 4, 2010

a bit of history~~

The first few weeks we lived in this old house were both wonderful and difficult. The biggest issue for me was that I have a touch of vertigo and the height of the bedroom ceilings took some getting used to. I'd get up in the morning and have to touch the bed frame until that little bit of dizziness passed; then take a few cautious steps until I adjusted to the confines of a 100 year old house that was nothing like the very open modern house we'd spent the previous 13 years in. It took about 2 months for me to be able to just get up and get moving in the mornings. Dallas, who has inherited the family's tendency for vertigo, had much the same issue.

The downstairs (with its small rooms) didn't affect my vertigo but I sensed that it could very easily have caused a claustrophobic feeling but for two things - the back porch had been converted into a mudroom with three large windows and the original front porch had been converted into what would be my office essentially adding an openness to the floor plan that hadn't always existed. I remember telling my mother that I wouldn't have been able to live here otherwise.

Our original intent in buying one of these old houses was to do a complete restoration to what it would have looked like when it was built; actually living in this one quickly made us realize that that would not be the path we would take. The hardworking farmers who built this house would actually have spent very little time inside it; it sheltered them from winds and rains but their days were spent outside working the fields by hand and selling their produce to diners and shops and at roadside stands and the sun going down found them seeking their beds and not spending the evening hours watching T.V. If they did relax in the evenings, it was likely on one of the three porches (maybe there was even a fourth that we don't know about) to escape the summer heat of Florida..it is unlikely that they sat inside a house without an air conditioner even during the extended days of spring, summer and early fall. Rooms were built for function, not comfort...they were built for easy heating and catching the breezes, and holding the light for as long as possible...not for inside living anymore than absolutely necessary. Enclosing those porches were modern touches and ones that I needed to remain intact despite our original intent.

The office, as I've written before, was actually the front porch and entry to this house when it was built. The driveway that now runs about 10 feet from that side of the house was a road that cut through the fields in those days. Sometime in the 1940's, the county decided that they wanted to put in a road going the opposite direction from the one the farmers used and so they used eminent domain to take some of the property that ran beside the house for that purpose.

The four families whose land they were taking fought it for a couple of years, but in the end the "man" won and the new road was put in. The three farmhouses most affected were then not facing the road. Only two of those farmhouses still stand today - ours and our farmer across the street; and both of them had front porches put on what used to be the sides of the houses. Ours went on pretty quickly after the road went in, but the farmer across the street only added his within the last ten years making do prior to that with the changing out of a "side" door to a more formal front door and stoop.

Although many of the old farmhouses had staircases to the second story on the outside of their homes, for some reason, our farmer had the staircase put inside. You entered the house from one of two exterior doors - doors that now lead into our kitchen on the one side and our living room on the other and then there was that window that we just uncovered that looked into the dining room at the foot of those stairs.

That old front porch and entry was simply designated the side porch and entry by our builder/farmer until the wife was an elderly widow living with her son. When her health began to fail and she couldn't make it up those stairs, they enclosed the old front porch to make her a downstairs bedroom. It was a simple job requiring only that one wall be built and although that wall was added, she never slept in that room. When her son died several years later, her grand nephew bought the house, covered the exterior siding with sheet rock and added four large windows to the exterior wall and used that room as a TV room; they left the original front porch floor in the room and covered it with area rugs. And the old stoop is still right where it always was giving us a glimpse of what used to be.

The room is an odd shape since it was a small front porch - its 9 x 16 - long and narrow and most folks who visited us were confused by its placement and its shape...they sensed that it used to be something else, but couldn't quite figure it out. And so we'd tell the story of that strange yet comfortable room and we planned to rip out that sheet rock and expose the history of the room - and almost seven years later we've done it. It is what it is - a former front porch, enclosed to suit the needs of the families that have lived here - with the siding and that window now exposed you know what you are walking into ...... and it is I think, actually my favorite room in the house.


Sunday, October 3, 2010

Walking around deciding~~

whether we liked that new paint color or not~~Actually, that verdict is still not in but we're getting closer. We like it when we're in the room and when we're looking at it from the door on the living room side of the room but, when we're looking in from the kitchen? Well, that's the view we're not quite sure works.

That first day of painting, we all loved the color despite its being a bit deeper then it had looked in the can. But the next day, after the walls were covered with their second coat, is when the uncertainty started creeping its way in. I knew immediately that it was that dark green bead board ceiling that was causing the issue but no way was I repainting that thing a different color, so we had to figure out how to make the wall color work or change it.


You can just glimpse the dark green bead board ceiling that is causing the issue with the paint color. The ceiling is visible from the kitchen but from the living room, you don't see it until you actually enter the office.

I knew we'd hit that point in decorating that you sometimes see on those HGTV shows....you know...when the homeowner says "I hate it" and the designer says "wait till it all comes together"....and so that's what I told the family while I secretly crossed my fingers behind my back. While the boys went off to Marching Band Camp and David went to work, I'd sit and stare at the room from the kitchen table convincing myself that I was right ... it would all come together...somehow...because I loved that wall color and knew it would look fantastic next to the wood of the bookcases, Papa's chair and my desk....and no way was I going through all the work required to paint that ceiling a different color.

I went ahead with the trim painting and it started to look better once the light green (that I've never really been happy with) was all covered with the new reddish one but still I was starting to think I may just have to sand down that bead board ceiling and paint it a much lighter color after all because no way was I losing that wall color.


And then, I moved into the kitchen and started painting the trim in there with that new reddish one and it started to work. And it hit me...the walls in the kitchen are Benjamin Moore White Sands and that was what was needed in the office to tie it all in, and I didn't need to spend days on that ceiling. We'll have to frame in all four corners of the office and put crown molding along the ceiling to cover up all the joins - when that goes in painted White Sands, it will break up the currently overwhelming color in that office; add in the ceiling fan blades and the blinds that are nearly an identical match to the White Sands paint, and we'd be fine. But I still knew that it would need another step to make it really work because of the view from the kitchen - it was just too jarring to the eye when you came in the house through the mudroom door and entered the kitchen.

Still sitting at the kitchen table, staring into the room while imagining the trim painted White Sands, the ceiling fan blades back up along with the blinds, flipping through magazines for inspiration, I made a decision. I decided that painting below the chair rail in the mudroom the same color as the walls in the office, will tie the mudroom, kitchen and office together for the eye of the beholder and avoid that "wow, you painted the office and I'm not sure I like it" look from those who enter our house. (And even better, it will serve to hide the evidence of the rough treatment the mudroom walls get from tossed shoes, backpacks, and dogs who shake off rain....).

Two years ago, I ran out of ideas for the mudroom walls and just painted them the same White Sands as the kitchen, but with the chair rail and moldings all going red. I tried to do a faux bead board look below the chair rail but it didn't work out; I'm glad that the office Reno actually helped me decide just what to do with those walls. (Let's hope it works out and I can tell the family that it "see...(it) all came together" - and uncross those fingers!)

And so, with the ceiling given a fresh coat of its dark green paint, with the walls painted and the trim painted, David started to frame out the floor in preparation for the new hardwood floor.


There's now insulation between those boards; before this renovation, the floor was the original wood flooring of the old front porch - no insulation at all...made for very cold winter days and a vast supply of slipper socks.

Which brings us to where we are with the room today. The floor is stained and drying; the finishing was supposed to take place yesterday but the rain put it off and now, today, I'm not in the mood to work in that office. So tomorrow the finishing touches begin on the flooring and then in two weeks, we'll get on the trim. We're hoping for a November finish to the room...but I'm not holding my breath...just as long as its done by Thanksgiving, I'll be happy~


This photo was taken after dark on Friday so the coloring is not quite right and the image is a bit blurry - but imagine White Sands trim up the corners....big baseboards (not the cheap modern ones that were in the room before) and lovely bookcases and soft lighting...that's what I'm doing anyway. Here's to being done by Thanksgiving!

Thursday, September 30, 2010

About that office...

I'm sitting here in the midst of falling sawdust; David is sanding away at that office floor that we laid three weeks ago and have just gotten back to. And of course, I'm kicking myself for all the cleaning I did yesterday in the kitchen because that sawdust has seeped through the covered doorway and is even now settling on all the furniture. After 7 years of life in an (almost) constant construction zone, I should have known better. But, I wanted to get ready for the fall decorating that I plan on doing this weekend while David's at work and H is at a band rehearsal and that decorating didn't include the spiders (and their cobwebs) that have crawled in and tried to make homes in all the nooks and crannies of this kitchen.

Despite the sawdust, I'm glad that we've been able to finally get back to the office; like most of the projects in the house restoration we have been living with, it has had to take a back burner to the rest of our life and has stretched out the time we had planned to get it done. While typically life slows down a bit during the daytime with the resumption of school, that didn't happen this time around. David's work schedule allows him two to three days off each week during which we normally make great progress on our projects, but he's had back issues and with a family member needing some help with a broken foot...not to mention Hunter's crazy schedule.. we're entering month three on the project. Yesterday, while I was cleaning I suddenly realized that I haven't posted an update on the work that has been done in that room, so over the next few days I'll try to post some of the photos that I did remember to take.

With an unemployment rate of 11 plus in Florida, and teens and college students being some of the hardest hit in our area, Dallas wasn't able to go back to his previous summer job so we put him to work earning his dinner here. He not only took over the yard work, but also did a lot of the deconstruction that goes on before you can get to the reconstruction that you really want to do. So, he and Hunter tore down most the sheet rock that our previous owners had put up over the original exterior siding:


David helped the boys in the early part of the job...we'd been waiting seven years to uncover an original window that we knew existed behind that sheet rock. Closing in that porch and adding a bathroom on to the house in the 1960's had meant that the dining room had no windows in it at all. We plan on putting one in the one exterior wall of that room, but that is down the road a bit. In the meantime, we couldn't wait to see how big that window was and to see just how much light would be let into the dining room once it was exposed again.


It was much bigger than we expected but then so was the light it let in....(the wall where you see the crosses hanging is where we'll eventually add an exterior window...the junk on the piano? ... all from the office so please, no comments on decorating style~~)


This next one is looking from the dining room into the office. The size of the window meant that we had some thinking to do about what we were going to put in it. The original plan was to put in a stain glass window from one of the local antique stores, but since these are steep stairs and teenage boys have been known to race down them and fall, well, we decided that stained glass would be 1) too expensive and 2) too dangerous.


The window was in just the right spot and will be just the right size for an elbow to go straight through it as someone tumbles down those last few stairs in their race to the bottom, so while David and I rethought it all out, the boys kept on exposing the siding. We didn't know what to expect...as most anyone who has worked on one of these old houses knows, opening walls can lead to all sorts of things. And we've already experienced finding cut joists leaving a bath tub basically hanging in mid air without support...so we were glad to see this when it was all down...


The siding was in really good shape considering it's 100 years old; we could see where pieces or sections had been replaced over the years, but about 95% of it is the original wood. Other than some caulking and wood puttying, there was nothing major to worry about. So, then it was on to just what was going to go in that window opening.

Several years ago, a friend of ours bought another old farmhouse in Georgia; there was a barn on that property where it seemed that every thing the family had ever owned and no longer needed or wanted had been stored. We helped a bit with the sorting of the things stored there and our friend pretty much gave his helpers anything they might be able to use. We took home a glass block window and have been storing it ever since. We planned on using it in the downstairs bathroom when we get around to rebuilding that room, but now, it seemed to be the perfect solution for that window opening. I did a bit of research to see when glass block had first been used to make sure that it wasn't completely inappropriate for this old house and our less than 100% faithful restoration of it. And then we placed it in and lived with it for a few days....


And decided that it was perfect...


It lets light into the dining room while still giving some privacy to the office and its a lot safer than stained glass.


Once the window was in (but still unframed) it was time to begin working on the walls; the boys puttied and caulked and sanded for what I know seemed like weeks to them and finally I was able to get in there and re-paint the bead board ceiling and the 100 year old siding.... and then, walk around for days trying to decide if I liked the new color we'd picked out....

More later.......

Monday, July 5, 2010

Life in a constant (almost) construction zone~~

Getting ready to begin on the office; I've been to arrange-a-room at Better Homes and Gardens and figured out the new furniture layout and I have a pretty good idea of the paint colors to come.....but now, for me...its the really hard part - getting it all organized BEFORE we empty the room.

I've learned over the six years of almost constant construction to sort through things before we unload the room and find storage for a full room s worth of stuff for a couple of months - by the time the project is completed and we're moving the furniture back in, I'm too exhausted and excited to take the time to really sort...things I planned on throwing out, giving away or keeping in storage end up right back in the room.....

I spent today going through years of saved magazines...Country Living, Country Home, Hobby Farms and Hobby Farm Homes, Traditional Home and Southern Accents.....among a few others. I've been clipping out gardening articles, photos of things I like and recipes and then placing mags in the recycle bin. Next on the list is to fill binders with the articles and photos in protective sleeves....that's tomorrow's chore. And then, its put the bookcases here and the desk there and the chair in that room......and the wall hangings....well, I haven't figured that part out yet........And then its tear down dry wall and expose the electrical and lay the new flooring and.....

One last look at the current version of the room...........


Here we go again.................

LinkWithin

Related Posts Widget for Blogs by LinkWithin